Mylar Trains: Honest Review for Embroidery Projects
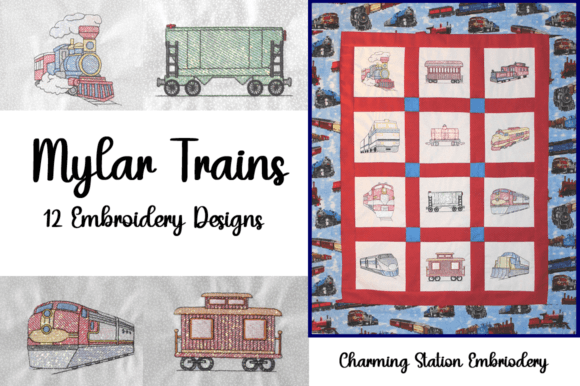
When I first opened the Mylar Trains design set on Creative Fabrica, I immediately saw the potential. Twelve distinct train designs, each one drawn with a charming, almost storybook quality that feels both nostalgic and playful. These are not hyper-realistic locomotive renderings. Instead, they lean into a decorative, whimsical personality that would sit beautifully on children's items, handmade gifts, and boutique apparel. The set falls under the Transportation category, and as an Embroidery designer, I could instantly picture these stitched out on a quilt square, a toddler's sweatshirt, or a custom tote bag for a train-obsessed little one.
What makes Mylar Trains particularly interesting is the Mylar optimization. Mylar is a thin, shiny metallic sheet that gets placed under the stitching. The needle perforates it, and the satin stitches hold it in place, creating a reflective, almost glittering surface that catches light beautifully. This means the train designs are built with open areas meant to showcase that shimmer, rather than relying entirely on dense fill stitching. The visual mood is cheerful, bright, and crafted with a handmade aesthetic that feels intentional rather than overly polished. For anyone who sells handmade product lines or runs an Etsy shop, this kind of design has a broad, giftable appeal.
First Impressions and Visual Personality
Looking through the twelve designs, I noticed a nice variety in train shapes. Some are classic steam engines with rounded boilers and puffs of stylized smoke. Others have a more modern passenger-train silhouette. The detailing is clean enough that the satin stitch outlines will read clearly, but there is enough open space to let the Mylar do its work. The artwork does not rely on overly intricate, tiny elements that would turn muddy on textured fabric. That is a thoughtful touch from the digitizer. Too many machine embroidery design sets forget that tiny details can disappear into the fabric pile, especially on sweatshirt fleece or quilt cotton. Here, the shapes are bold and well-proportioned.
I also appreciate that the set includes twelve designs. That number alone opens up a lot of creative possibilities. A full quilt with twelve different blocks becomes a cohesive, themed project. A set of twelve patches can be sold as a bundle. Individual designs can be paired with a child's name for a personalized gift. The variety keeps the set from feeling repetitive, and each train has enough unique character to stand on its own or work as part of a collection. For a Creative Fabrica embroidery download, the value here is in the versatility.
Where Mylar Trains Truly Shines
In my experience, designs optimized for Mylar work best on projects where the shiny effect can be fully appreciated. A tote bag design featuring one of these trains would catch light as the bag moves. A sweatshirt embroidery placement on the chest or across the back would have that eye-catching shimmer that makes people stop at a craft fair table. I have also seen Mylar designs perform beautifully on aprons, pillow covers, and even structured caps, though curved surfaces need extra care with placement and hooping.
For baby blankets and nursery decor, the reflective quality adds a sensory element that little ones seem to notice. A train stitched with Mylar on a soft cotton blanket becomes something a child can touch and watch sparkle. That kind of thoughtful detail elevates a simple finished product into something memorable. If you sell at craft fairs or through boutique merchandise listings, these small distinctive touches are what build buyer trust and repeat customers.
Quilt Projects and Multi-Design Layouts
The product description mentions quilts, and I completely agree. Twelve coordinated train designs make a beautiful thematic quilt. Each block could feature a different engine, and the Mylar would add a consistent shimmer across the entire piece. For a quilt, you will want to test your stitch density on the exact fabric and batting combination you plan to use. Quilt cotton is generally stable, but the Mylar layer adds thickness. A stabilizer choice like a medium-weight cutaway will help keep everything flat and prevent puckering around the reflective areas.
When planning a multi-design project like a quilt, I recommend stitching all twelve designs on scrap fabric first. Check the thread colors against the Mylar. Some metallic Mylar sheets have a silver or gold tone, and your thread choices should either match that undertone or create a deliberate contrast. A dark navy thread on silver Mylar gives a crisp, classic look. A bright red thread on gold Mylar feels vintage and warm. Testing helps you avoid surprises before you commit to the final fabric.
Practical Performance on Different Fabrics
I always evaluate a digital embroidery file set by imagining how it will behave on the fabrics my customers actually request. For custom apparel, the most common requests I get are sweatshirts, hoodies, and cotton t-shirts. Stretchy fabric can be tricky with Mylar because the metallic sheet has no give. The stitching needs to be dense enough to hold the Mylar securely, but not so dense that it perforates the fabric excessively. Using a proper cutaway stabilizer and a basting spray to hold the Mylar in place before stitching is non-negotiable here.
On dark fabric, the Mylar effect is stunning. The contrast between a deep charcoal sweatshirt and a shimmering silver train is dramatic and professional-looking. I recommend creating both light and dark fabric mockups, even simple printable mockup images, to see how the design reads. A design that looks charming on white can look absolutely striking on black or navy, and these are the kinds of details that make your product photography stand out in Etsy listings.
For baby items, softness matters. Mylar edges can feel slightly textured after stitching. The satin stitch border should fully encase the Mylar edges. If any Mylar peeks out, it can be scratchy against delicate skin. I always run my fingers over the finished stitch-out and trim any stray Mylar carefully. A quick wash and dry cycle on a test piece also tells you how the Mylar holds up. In my experience, well-stitched Mylar designs survive regular washing, but the metallic sheen can soften slightly over time. That is worth mentioning to customers if you sell items that need frequent laundering.
Tips for Embroiderers and Small Business Owners
If you are downloading Mylar Trains for commercial use, I recommend building a small checklist before you start a production run. First, confirm the hoop size required for each design. Some train designs may be wider than they are tall, so a square hoop like a 5x5 or 6x6 is often more practical than a narrow rectangular hoop. Check the product details on the Creative Fabrica page to verify the dimensions before you commit to a project. Do not assume all twelve designs fit the same hoop.
Second, review the embroidery file formats included. Different machines require different formats, and Creative Fabrica typically lists the available formats on the product page. If you need a specific format for a commercial multi-needle machine, double-check before downloading. This is a commercial embroidery consideration that saves headaches later.
Third, consider how you will present the finished items. An embroidered patch made from one of these train designs could be sold individually or as a set. Patches allow you to use the Mylar effect on a small, focused canvas. They also make excellent add-on products for craft fair displays. A basket of shiny train patches near a display of quilted blankets creates a cohesive brand story that encourages multiple purchases.
Stabilizer and Thread Recommendations
For most projects using Mylar Trains, I reach for a medium-weight cutaway stabilizer. If the fabric is particularly stretchy, like a sweatshirt, I add a temporary adhesive spray to hold the Mylar in place. The fill stitch areas should be checked for density. Too dense, and the needle can tear the Mylar rather than perforate it cleanly. Too sparse, and the Mylar may not be held securely. The digitizing should strike a balance, and from what I can see in the design previews, the open areas are thoughtfully placed.
For thread colors, I like to use a polyester embroidery thread. It has a slight sheen that complements the Mylar without competing with it. Cotton thread can look matte against the shiny Mylar, which creates a nice contrast if that is the look you want. Test a small section with both thread types to see which aesthetic matches your brand style.
Adding Value to Your Handmade Business
One of the smartest ways to use Mylar Trains is to create a small product line around the train theme. A child's sweatshirt, a matching tote bag, and a coordinating pillow cover can be sold as a gift set. This kind of curated collection feels intentional and increases the perceived value of your work. Buyers are more likely to trust a shop that presents cohesive, thoughtfully designed products rather than a random assortment of embroidered items.
For Etsy sellers and creative entrepreneurs, these designs also work well in printable mockup images. Even if you primarily sell physical items, a digital mockup showing the train on a variety of products helps customers visualize the possibilities. It also strengthens your brand consistency across your shop listings. The nostalgic, whimsical mood of the train designs lends itself to a warm, story-driven brand narrative that resonates with gift shoppers.
What to Watch Out For
No design set is perfect for every situation. With Mylar Trains, the main consideration is the Mylar material itself. It requires an extra step in the stitching process. You need to place the Mylar sheet, stitch the placement line or the first color stop, then trim the excess Mylar before the final satin border stitches. This is not difficult, but it does add time to each project. If you are producing items in bulk for a craft fair, factor that extra step into your production schedule.
Also, be mindful of small hoop sizes. If a design is too large for your hoop, you cannot simply resize a Mylar-optimized design without risking distortion. The open areas are digitized at specific dimensions, and resizing changes the relationship between the stitches and the Mylar. Always check the product details on Creative Fabrica for the exact hoop requirements before purchasing.
Finally, tiny lettering is not a concern with this particular set because the designs are primarily illustrative. That is a relief. Small text on textured fabric or over Mylar can be a nightmare to stitch cleanly. The bold, graphic nature of these train designs sidesteps that problem entirely.
Final Thoughts on the Download
After spending time evaluating Mylar Trains from the perspective of a working embroidery designer, I can say this set fills a specific niche very well. It is not a generic collection of train silhouettes. It is a thoughtfully assembled group of twelve designs that leverage the Mylar technique to create something visually distinctive. The designs feel cohesive as a set, offer enough variety to keep projects interesting, and suit a wide range of handmade product ideas from quilt blocks to custom apparel.
For Creative Fabrica embroidery users who already have experience with Mylar, this set is a straightforward, rewarding download. For those new to Mylar, the designs are simple enough to be a good introduction to the technique without being overly complex. The design assets are clean, the concept is charming, and the finished results, when stitched with care, look genuinely professional. Whether you are a commercial embroidery professional, a boutique merchandise creator, or a craft fair regular looking for something fresh, Mylar Trains deserves a spot on your shortlist. Just remember to test on scrap fabric, check your hoop size, and always verify the licensing details on the product page before selling your finished pieces.